![[번역] How to write your own Virtual DOM 2: Props & Events](https://blog.leedohyun.com/wp-content/uploads/2024/03/image-3.png)
https://medium.com/@deathmood/write-your-virtual-dom-2-props-events-a957608f5c76
안녕하세요!
나는 이 주제를 계속하고 궁극적으로 우리가 ‘baby’ 가상 DOM 구현에서 실제 프로젝트에서 사용할 수 있는 smth로 이동할 수 있게 해주는 모든 다음 사항을 여러분과 공유하게 되어 매우 기쁩니다.
오늘은 주로 속성(props) 설정/차이와 이벤트 처리에 대해 이야기하겠습니다. 확인 가자 😉
시리즈의 두 번째 기사입니다. 이곳에 처음 오신 분이라면 소개를 꼭 읽어보세요 .
Babel로 다루기
props로 시작하기 전에 이전 구현에서 한 가지 작은 차이를 수정해야 합니다. 다음과 같이 속성(props) 없이 노드만 있는 경우:
<div></div>Babel은 트랜스파일할 때 속성이 없기 때문에 요소의 props 속성을 'null'로 설정합니다 . 따라서 우리는 다음을 갖게 됩니다:
{ type: ‘’, props: null, children: [] }기본적으로 빈 객체 로 설정하는 것이 더 좋습니다 . 그러면 속성을 반복하는 동안 오류가 발생하지 않습니다(나중에 확인하게 됩니다). 이 문제를 해결하기 위해 h(…) 함수를 다음과 같이 수정합니다 .
function h(type, props, …children) {
  return { type, props: props || {}, children };
}
props 설정
props 설정은 정말 간단합니다. 곧 알게 될 것입니다. DOM 표현을 기억하시나요? 거기에 일반 JS 객체와 같은 props 를 저장하므로 이 마크업의 경우 다음과 같습니다.
<ul className=”list” style=”list-style: none;”></ul>
우리는 다음과 같은 메모리 내 표현을 갖게 될 것입니다:
{
  type: ‘ul’,
  props: { className: ‘list’, style: ’list-style: none;’ }
  children: []
}
따라서 props 객체의 각 필드는 attribute name 이고 이 필드의 값은 attribute value 입니다 . 따라서 실제 DOM 노드에만 이 항목을 설정하면 됩니다. setAttribute(…) 메소드 주위에 함수 래퍼를 작성해 보겠습니다 .
function setProp($target, name, value) {
  $target.setAttribute(name, value);
}
이제 우리는 하나의 속성(prop)을 설정하는 방법을 알았습니다. props 객체의 모든 필드를 반복하여 속성을 모두 설정할 수 있습니다.
function setProps($target, props) {
  Object.keys(props).forEach(name => {
    setProp($target, name, props[name]);
  });
}
이제 createElement(…) 함수를 기억하시나요? 실제 DOM 노드 생성 직후에 setProps(..)를 설정하겠습니다 .
function createElement(node) {
  if (typeof node === ‘string’) {
    return document.createTextNode(node);
  }
  const $el = document.createElement(node.type);
  setProps($el, node.props);
  node.children
    .map(createElement)
    .forEach($el.appendChild.bind($el));
  return $el;
}
그러나 이것이 끝이 아닙니다. 우리는 몇 가지 작은 것들을 잊어버렸습니다. 먼저 'class'는 JS에서 예약어이므로 속성 이름으로 사용하지 않습니다. 우리는 'className'을 사용할 것입니다:
<nav className="navbar light">
  <ul></ul>
</nav>
하지만 실제 DOM에는 'className' 속성이 없으므로 setProp(…) 함수에서 이를 처리해야 합니다.
또 다른 점은 다음과 같이 부울 값을 사용하여 부울 DOM 속성(예: 선택됨, 비활성화됨)을 설정하는 것이 더 편리하다는 것입니다.
<input type="checkbox" checked={false} />이 샘플에서는 'checked' 속성이 실제 DOM 요소에 설정되지 않을 것으로 예상합니다. 그러나 실제로는 그렇게 될 것입니다. 아시다시피 이 속성의 존재만으로도 설정하기에 충분하기 때문입니다. 그래서 우리는 그것을 고쳐야 합니다. 속성을 설정할 뿐만 아니라 요소 참조에 해당 부울 속성도 설정한다는 점에 유의하세요.
function setBooleanProp($target, name, value) {
  if (value) {
    $target.setAttribute(name, value);
    $target[name] = true;
  } else {
    $target[name] = false;
  }
}
좋아요. 여기서 마지막으로 말할 것은 사용자 정의 속성입니다. 내 말은, 이것이 우리 자신의 구현이므로 앞으로는 다른 역할을 갖고 DOM에 표시되어서는 안 되는 속성을 갖고 싶을 수도 있다는 것입니다. 따라서 우리는 이 속성이 사용자 정의인지 여부를 확인하는 함수를 작성하겠습니다. 아직 사용자 정의 속성이 없기 때문에 지금은 비어 있습니다.
function isCustomProp(name) {
  return false;
}
위의 모든 문제를 해결하는 완성된 setProp(..) 함수 는 다음과 같습니다 .
function setProp($target, name, value) {
  if (isCustomProp(name)) {
    return;
  } else if (name === ‘className’) {
    $target.setAttribute(‘class’, value);
  } else if (typeof value === ‘boolean’) {
    setBooleanProp($target, name, value);
  } else {
    $target.setAttribute(name, value);
  }
}
이제 JSFiddle에서 테스트해 보겠습니다.
/** @jsx h */

function h(type, props, ...children) {
  return { type, props: props || {}, children };
}

function setBooleanProp($target, name, value) {
  if (value) {
    $target.setAttribute(name, value);
    $target[name] = true;
  } else {
    $target[name] = false;
  }
}

function isCustomProp(name) {
  return false;
}

function setProp($target, name, value) {
  if (isCustomProp(name)) {
    return;
  } else if (name === 'className') {
    $target.setAttribute('class', value);
  } else if (typeof value === 'boolean') {
    setBooleanProp($target, name, value);
  } else {
    $target.setAttribute(name, value);
  }
}

function setProps($target, props) {
  Object.keys(props).forEach(name => {
    setProp($target, name, props[name]);
  });
}

function createElement(node) {
  if (typeof node === 'string') {
    return document.createTextNode(node);
  }
  const $el = document.createElement(node.type);
  setProps($el, node.props);
  node.children
    .map(createElement)
    .forEach($el.appendChild.bind($el));
  return $el;
}

//--------------------------------------------------

const f = (
  <ul style="list-style: none;">
    <li className="item">item 1</li>
    <li className="item">
      <input type="checkbox" checked={true} />
      <input type="text" disabled={false} />
    </li>
  </ul>
);

const $root = document.getElementById('root');
$root.appendChild(createElement(f));
<div id="root"></div>.item {
background: yellow;
margin: 10px 0;
}props 비교
자, 이제 소품을 사용하여 요소를 만들 수 있으므로 차이점을 생각하는 방법을 생각해 볼 차례입니다. 결국에는 속성을 설정 하거나 제거 해야 합니다 . 우리는 이미 props를 설정할 수 있는 함수를 작성했습니다 . 이제 이를 제거 할 수 있는 함수를 작성해 보겠습니다 . 실제로 이는 매우 간단한 프로세스이므로 이에 대해서는 언급하지 않겠습니다.
function removeBooleanProp($target, name) {
$target.removeAttribute(name);
$target[name] = false;
}
function removeProp($target, name, value) {
if (isCustomProp(name)) {
return;
} else if (name === ‘className’) {
$target.removeAttribute(‘class’);
} else if (typeof value === ‘boolean’) {
removeBooleanProp($target, name);
} else {
$target.removeAttribute(name);
}
}
이제 두 가지 속성(기존 속성과 새 속성)을 비교하고 그 비교 결과에 따라 실제 DOM 노드를 수정하는 updateProp 함수를 작성해 보겠습니다 . 실제로 우리는 다음 사례를 처리해야 합니다.
- 새 노드 에는 해당 이름을 가진 속성이 없으므로 제거해야 합니다.

- 이전 노드 에는 해당 이름을 가진 속성이 없으므로 이를 설정해야 합니다.

- 해당 이름을 가진 속성은 새 노드 와 이전 노드 모두에 존재합니다 . 그런 다음 해당 값을 비교해야 합니다 . 두 값이 같지 않으면 해당 속성을 새 노드 의 값으로 다시 설정해야 합니다.

- 다른 경우에는 속성이 변경되지 않았으므로 아무것도 할 필요가 없습니다.
좋아요. 다음은 하나의 prop에 대해 정확히 동일한 작업을 수행하는 함수입니다.
function updateProp($target, name, newVal, oldVal) {
if (!newVal) {
removeProp($target, name, oldVal);
} else if (!oldVal || newVal !== oldVal) {
setProp($target, name, newVal);
}
}간단하지 않았나요? 그러나 노드는 하나 이상의 속성을 가질 수 있으므로 모든 prop을 반복하고 각 쌍에 대해 updateProp(…) 함수 를 호출할 수 있는 함수를 작성해 보겠습니다 .
function updateProps($target, newProps, oldProps = {}) {
const props = Object.assign({}, newProps, oldProps);
Object.keys(props).forEach(name => {
updateProp($target, name, newProps[name], oldProps[name]);
});
}여기서는 새 노드와 이전 노드의 소품을 모두 포함하는 복합 개체를 생성하고 있습니다. 따라서 props를 반복하는 동안 '정의되지 않은' 항목이 있을 수 있지만 괜찮습니다. 함수가 이를 처리할 수 있습니다.
마지막으로 해당 함수를 updateElement(…) 함수에 넣는 것입니다(이전 여정에서 기억하시나요?). 어디에 넣어야 할까요? 아마도 노드가 변경되지 않았고 그 자식을 비교하려는 경우 이전에 해당 속성을 확인하고 싶을 수도 있습니다. 따라서 하위 노드를 비교하기 직전에 마지막 `if` 절에 이를 넣습니다.
function updateElement($parent, newNode, oldNode, index = 0) {
...
} else if (newNode.type) {
updateProps(
$parent.childNodes[index],
newNode.props,
oldNode.props
);
...
}
}그리고 이것이다. 계속해서 테스트해 보세요.
/** @jsx h */
function h(type, props, ...children) {
return { type, props: props || {}, children };
}
function setBooleanProp($target, name, value) {
if (value) {
$target.setAttribute(name, value);
$target[name] = true;
} else {
$target[name] = false;
}
}
function removeBooleanProp($target, name) {
$target.removeAttribute(name);
$target[name] = false;
}
function isCustomProp(name) {
return false;
}
function setProp($target, name, value) {
if (isCustomProp(name)) {
return;
} else if (name === 'className') {
$target.setAttribute('class', value);
} else if (typeof value === 'boolean') {
setBooleanProp($target, name, value);
} else {
$target.setAttribute(name, value);
}
}
function removeProp($target, name, value) {
if (isCustomProp(name)) {
return;
} else if (name === 'className') {
$target.removeAttribute('class');
} else if (typeof value === 'boolean') {
removeBooleanProp($target, name);
} else {
$target.removeAttribute(name);
}
}
function setProps($target, props) {
Object.keys(props).forEach(name => {
setProp($target, name, props[name]);
});
}
function updateProp($target, name, newVal, oldVal) {
if (!newVal) {
removeProp($target, name, oldVal);
} else if (!oldVal || newVal !== oldVal) {
setProp($target, name, newVal);
}
}
function updateProps($target, newProps, oldProps = {}) {
const props = Object.assign({}, newProps, oldProps);
Object.keys(props).forEach(name => {
updateProp($target, name, newProps[name], oldProps[name]);
});
}
function createElement(node) {
if (typeof node === 'string') {
return document.createTextNode(node);
}
const $el = document.createElement(node.type);
setProps($el, node.props);
node.children
.map(createElement)
.forEach($el.appendChild.bind($el));
return $el;
}
function changed(node1, node2) {
return typeof node1 !== typeof node2 ||
typeof node1 === 'string' && node1 !== node2 ||
node1.type !== node2.type
}
function updateElement($parent, newNode, oldNode, index = 0) {
if (!oldNode) {
$parent.appendChild(
createElement(newNode)
);
} else if (!newNode) {
$parent.removeChild(
$parent.childNodes[index]
);
} else if (changed(newNode, oldNode)) {
$parent.replaceChild(
createElement(newNode),
$parent.childNodes[index]
);
} else if (newNode.type) {
updateProps(
$parent.childNodes[index],
newNode.props,
oldNode.props
);
const newLength = newNode.children.length;
const oldLength = oldNode.children.length;
for (let i = 0; i < newLength || i < oldLength; i++) {
updateElement(
$parent.childNodes[index],
newNode.children[i],
oldNode.children[i],
i
);
}
}
}
//---------------------------------------------------------
const f = (
<ul style="list-style: none;">
<li className="item">item 1</li>
<li className="item">
<input type="checkbox" checked={true} />
<input type="text" disabled={false} />
</li>
</ul>
);
const g = (
<ul style="list-style: none;">
<li className="item item2">item 1</li>
<li style="background: red;">
<input type="checkbox" checked={false} />
<input type="text" disabled={true} />
</li>
</ul>
);
const $root = document.getElementById('root');
const $reload = document.getElementById('reload');
updateElement($root, f);
$reload.addEventListener('click', () => {
updateElement($root, g, f);
});<button id="reload">RELOAD</button>
<div id="root"></div>#root {
border: 1px solid black;
padding: 10px;
margin: 30px 0 0 0;
}
.item {
  background: yellow;
  margin: 10px 0;
}
.item2 {
background: green;
}Events
물론 일반적인 동적 앱을 가지려면 이벤트를 처리하는 방법을 알아야 합니다. 이 시점에서 우리는 이미 클래스별로 노드를 querySelector(…) 한 다음 해당 노드에 EventListener(…)를 추가 할 수 있습니다. 그러나 그것은 흥미롭지 않습니다. 사실 저는 React처럼 smth를 갖고 싶습니다:
<button onClick={() => alert(‘hi!’)}></button>응, 이거 괜찮아 보이는데. 보시다시피 여기서는 props를 사용하여 이벤트 리스너를 선언하고 있습니다. 그리고 속성 이름은 `on` 접두사로 시작합니다.
function isEventProp(name) {
return /^on/.test(name);
}소품 이름 에서 이벤트 이름을 추출하기 위해 다음 함수를 작성합니다(`on` 접두사만 제거함).
function extractEventName(name) {
return name.slice(2).toLowerCase();
}
props 객체에서 이벤트를 선언하는 경우 setProps(..)/updateProps(…) 함수 에서 이벤트를 처리해야 하는 것 같습니다 . 하지만 다시 생각해 보세요. 실제로 기능을 어떻게 비교할 수 있습니까 ? 어떻게?
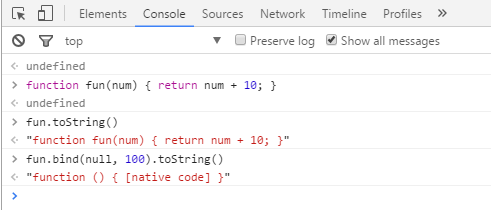
등호로 비교할 수 없습니다. 글쎄, toString() 메소드를 사용 하고 함수의 코드를 비교할 수 있습니다. 하지만 여기에는 몇 가지 문제가 있습니다. 내부에 네이티브 코드가 포함된 일부 함수가 있으므로 이러한 방식으로 비교할 수 없습니다.
물론 이벤트 버블링을 사용하여 이를 처리할 수 있습니다. ‘body’ 또는 루트 요소에 연결되고 내부 요소의 모든 이벤트를 처리할 자체 이벤트 관리자를 작성할 수 있습니다. 따라서 업데이트할 때마다 이벤트 리스너를 다시 추가할 수 있으며 비용이 많이 들지 않습니다.
하지만 여기서는 그렇게 하려고 하지 않을 것입니다. 이는 더 많은 문제를 추가하며 실제로 이벤트 리스너는 자주 변경되지 않습니다. 따라서 요소 생성 시 이벤트 리스너를 한 번만 설정해 보겠습니다 .
따라서 우리는 setProps(…) 함수가 실제 DOM 노드에 이 이벤트 소품을 설정하는 것을 원하지 않습니다 . 우리는 이벤트 리스너 추가를 직접 처리하려고 합니다. 호 이걸 하려고? 맞춤 소품을 확인하는 기능을 기억하시나요? 이제 비어 있지 않습니다.
function isCustomProp(name) {
return isEventProp(name);
}실제 DOM 노드를 알고 props 객체가 있는 경우 이벤트 리스너를 추가하는 것도 매우 간단합니다.
function addEventListeners($target, props) {
Object.keys(props).forEach(name => {
if (isEventProp(name)) {
$target.addEventListener(
extractEventName(name),
props[name]
);
}
});
}이를 createElement 함수 에 넣어보겠습니다 .
function createElement(node) {
if (typeof node === ‘string’) {
return document.createTextNode(node);
}
const $el = document.createElement(node.type);
setProps($el, node.props);
addEventListeners($el, node.props);
node.children
.map(createElement)
.forEach($el.appendChild.bind($el));
return $el;
}이벤트 다시 추가
정말로 이벤트 리스너를 다시 추가해야 한다면 어떻게 될까요? 간단하게 설명하겠습니다. 매우 간단한 해결책이 하나 있습니다. 그러나 불행하게도 성능에 해를 끼칩니다. ‘forceUpdate’라는 사용자 정의 속성을 하나 더 소개하겠습니다. 노드가 변경되었는지 어떻게 확인하는지 기억하시나요? 이 기능을 수정하겠습니다.
function changed(node1, node2) {
return typeof node1 !== typeof node2 ||
typeof node1 === ‘string’ && node1 !== node2 ||
node1.type !== node2.type ||
node.props.forceUpdate;
}따라서 `forceUpdate`가 true이면 노드가 완전히 다시 생성되고 이에 따라 새 이벤트 리스너가 추가됩니다. 여기서도 처리해야 합니다. 왜냐하면 이 prop이 실제 DOM 노드에 설정되는 것을 원하지 않기 때문입니다.
function isCustomProp(name) {
return isEventProp(name) || name === ‘forceUpdate’;
}그리고 그게 거의 전부입니다. 예, 이 솔루션은 성능에 좋지 않습니다. 그러나 그것은 간단합니다 :))
계속해서 테스트해 보세요.
/** @jsx h */
function h(type, props, ...children) {
return { type, props: props || {}, children };
}
function setBooleanProp($target, name, value) {
if (value) {
$target.setAttribute(name, value);
$target[name] = true;
} else {
$target[name] = false;
}
}
function removeBooleanProp($target, name) {
$target.removeAttribute(name);
$target[name] = false;
}
function isEventProp(name) {
return /^on/.test(name);
}
function extractEventName(name) {
return name.slice(2).toLowerCase();
}
function isCustomProp(name) {
return isEventProp(name) || name === 'forceUpdate';
}
function setProp($target, name, value) {
if (isCustomProp(name)) {
return;
} else if (name === 'className') {
$target.setAttribute('class', value);
} else if (typeof value === 'boolean') {
setBooleanProp($target, name, value);
} else {
$target.setAttribute(name, value);
}
}
function removeProp($target, name, value) {
if (isCustomProp(name)) {
return;
} else if (name === 'className') {
$target.removeAttribute('class');
} else if (typeof value === 'boolean') {
removeBooleanProp($target, name);
} else {
$target.removeAttribute(name);
}
}
function setProps($target, props) {
Object.keys(props).forEach(name => {
setProp($target, name, props[name]);
});
}
function updateProp($target, name, newVal, oldVal) {
  if (!newVal) {
    removeProp($target, name, oldVal);
  } else if (!oldVal || newVal !== oldVal) {
    setProp($target, name, newVal);
  }
}
function updateProps($target, newProps, oldProps = {}) {
  const props = Object.assign({}, newProps, oldProps);
  Object.keys(props).forEach(name => {
    updateProp($target, name, newProps[name], oldProps[name]);
  });
}
function addEventListeners($target, props) {
  Object.keys(props).forEach(name => {
    if (isEventProp(name)) {
      $target.addEventListener(
        extractEventName(name),
        props[name]
      );
    }
  });
}
function createElement(node) {
if (typeof node === 'string') {
return document.createTextNode(node);
}
const $el = document.createElement(node.type);
setProps($el, node.props);
addEventListeners($el, node.props);
node.children
.map(createElement)
.forEach($el.appendChild.bind($el));
return $el;
}
function changed(node1, node2) {
return typeof node1 !== typeof node2 ||
typeof node1 === 'string' && node1 !== node2 ||
node1.type !== node2.type ||
node1.props && node1.props.forceUpdate;
}
function updateElement($parent, newNode, oldNode, index = 0) {
if (!oldNode) {
$parent.appendChild(
createElement(newNode)
);
} else if (!newNode) {
$parent.removeChild(
$parent.childNodes[index]
);
} else if (changed(newNode, oldNode)) {
$parent.replaceChild(
createElement(newNode),
$parent.childNodes[index]
);
} else if (newNode.type) {
updateProps(
$parent.childNodes[index],
newNode.props,
oldNode.props
);
const newLength = newNode.children.length;
const oldLength = oldNode.children.length;
for (let i = 0; i < newLength || i < oldLength; i++) {
updateElement(
$parent.childNodes[index],
newNode.children[i],
oldNode.children[i],
i
);
}
}
}
//---------------------------------------------------------
function log(e) {
console.log(e.target.value);
}
const f = (
<ul style="list-style: none;">
<li className="item" onClick={() => alert('hi!')}>item 1</li>
<li className="item">
<input type="checkbox" checked={true} />
<input type="text" onInput={log} />
</li>
{/* this node will always be updated */}
<li forceUpdate={true}>text</li>
</ul>
);
const g = (
<ul style="list-style: none;">
<li className="item item2" onClick={() => alert('hi!')}>item 1</li>
<li style="background: red;">
<input type="checkbox" checked={false} />
<input type="text" onInput={log} />
</li>
{/* this node will always be updated */}
<li forceUpdate={true}>text</li>
</ul>
);
const $root = document.getElementById('root');
const $reload = document.getElementById('reload');
updateElement($root, f);
$reload.addEventListener('click', () => {
updateElement($root, g, f);
});<button id="reload">RELOAD</button>
<div id="root"></div>#root {
border: 1px solid black;
padding: 10px;
margin: 30px 0 0 0;
}
.item {
background: yellow;
margin: 10px 0;
}
.item2 {
background: green;
}결론
그게 다입니다 :)) 그것이 당신에게 흥미로웠기를 바랍니다. 이벤트 리스너를 비교하는 간단한 방법을 알고 있다면 의견을 통해 아이디어를 공유해 주시면 좋을 것입니다.
다음 글에서는 Virtual DOM을 위한 커스텀 컴포넌트 시스템을 작성해보겠습니다 :))
